Pages

Friday 28 February 2014

Thinking about Life in the Forest

I knew I'd love using Stampin' Up's Life in the Forest stamp set. The foxy little fellow from the set is gorgeous and I imagined him being quite thoughtful as he padded about the forest! Come and see:


I've used a split background again - I love doing this and it means I can introduce a little textured core'dinations card stock for a bit of subtle texture. The top half of the panel is stamped with the Hardwood background stamp - a real must-have in my opinion!


What a sweetheart this fabulous fox is! I stamped him onto watercolour paper so that I could watercolour him properly with my aquapainter. I found that stamping in Early Espresso meant that I could mix some of the brown ink into the Cajun Craze. Mr Fox comes with dots for eyes which are lovely but it's easy and fun to change the shape with a marker to change his expression as I've done here.


The beauty of the Just Sayin' speech and think bubbles is that you can make them say whatever you want! I made my card to let a friend know I was thinking of her so this sentiment from Peaceful Petals worked well and I just used my stamp-a-majig to position it perfectly within the frame.

HERE'S WHAT YOU'LL NEED TO MAKE THIS CARD
(Click on each item to find it quickly in my shop) 
Stamps: Life in the Forest wood or cling, Just Sayin' wood or cling,
Hardwood background stamp wood or cling
Ink: Baked Brown Sugar, Cajun Craze, Early Espresso
Card stock: Whisper White smooth, Wild Wasabi core'dinations, watercolour card stock
Other: Word Bubbles framelits, Big Shot, aqua painter, envelope board (for rounding corners), stamp-a-majig
Click above to place an order any time, day or night,
but if you have any queries, or prefer to speak to me, I'm always happy to help.
You can contact me by email or phone on 01280 820593.

CHOOSE A FREE SALE-A-BRATION GIFT WITH EVERY £45 YOU SPEND (excl. p&p)

The Life in the Forest creatures aren't the only cuties I've come across this week. "Did I show you the video of the deer making a noise?" my daughter asked chattily at the weekend when I got to spend an increasingly rare half hour with her. "Erm... no," I said. And then: "For goodness sake - how did you come across that? I mean what do you google to get a deer making a noise?!" She looked at me pityingly, the woman who doesn't come across cute videos in the course of my internet activity!

Well I bet you're just dying to see the video of the deer making a noise aren't you? Okay - here it is:


Have a great weekend and I'll see you very soon,


Thursday 27 February 2014

The cutest bunny in the forest (probably!)

When Stampin' Up's Life in the Forest stamp set arrived at my house there was a major squea fest - the little animals are just so cute! I used the adorable bunny for my Three Minute Thursday card today (and there's even a video tutorial if you scroll down!) Come and see:


I made this as a birthday card for a tot at first (as in the video) but it would make a perfect Easter card too (as above) - and you can always add tiny punched flowers or eggs if the whim takes you. Have you spotted the leafy bushes using the Petal Parade Sale-a-bration stamp set? I knew that was going to come in mighty handy! And how about the candy dot cotton tail for the rabbit. How cute is that?!

The candy dot is metal so I'm going to link this up with Less is More's Metal challenge and also with Addicted to Stamps and More, where the lovely ladies are running a CAS challenge.

Here's my short video tutorial - do let me know what you think won't you.


HERE'S WHAT YOU'LL NEED TO MAKE THIS CARD
(Click on each item to find it quickly in my shop) 
Stamps: Life in the Forest wood or cling, Teeny Tiny Wishes (for the sentiment) wood or cling,
Petal Parade (free with Sale-a-bration) wood or cling
Click above to place an order any time, day or night,
but if you have any queries, or prefer to speak to me, I'm always happy to help.
You can contact me by email or phone on 01280 820593.

CHOOSE A FREE SALE-A-BRATION GIFT WITH EVERY £45 YOU SPEND (excl. p&p)

Since Jamie Oliver's school lunches campaign seems to have faded into the dim and distant past, I'm a big believer in a large cooked breakfast to minimise my children's need to buy the rubbish that's available in the school canteen. Bacon, eggs, sausage, mushrooms, tomato are all regulars on my menu as well as a handful of rocket to get some extra nutrition into my youngest! The other day I asked him if he'd like one egg or two. He was obviously in French mode: "One is an oeuf," he said.

See you tomorrow,


Wednesday 26 February 2014

See Ya Later alligator - and thanks!

You may not be up for starting a full-scale business, but have you ever wished you could make your crafting pay for itself? Well there's no reason why you shouldn't? Did you know that when you join Stampin' Up, you get 20% back from every order you place? Even better, if you place a £150+ order in your first 45 days, you'll get a whopping 30% back! And until 31st March as part of the Sale-a-bration promotion, you can choose crafting products worth up to £150 in your starter kit and you'll only pay £99 for them! Those are some very good reasons to join - click here for a whole lot more!

I'm loving Sale-a-bration -  not least because I'm getting to use some very cool free stamp sets! Today's card uses one of my favourite images of the promotion - come and have a look:


What do you think of this alligator? I think he's just fabulous! He comes from the brilliant See Ya Later stamp set but he reminded me a little of the Lacoste motif (even though that's actually a crocodile... oops! sorry Mr Alligator - no wish to offend!) so thought he'd make a great  post card-style thank you card for a teenage boy.


This is so simple it's crazy! I inked up the alligator with a Garden Green marker and used a Stamp-a-majig to position him on the card stock...


... before adding the 'thank you' from Morning Meadow. Honestly, you'd blink and you'd have made hundreds of these!

This card really belonged in my Three Minute Thursday slot but I'll have another quick card for you tomorrow and hopefully a Quick as a Wink video to go with it, so don't miss that!

HERE'S WHAT YOU'LL NEED TO MAKE THIS CARD
(Click on each item to find it quickly in my shop) 
Stamps: See Ya Later (free with Sale-a-bration) wood or cling, Morning Meadow (hostess set) wood or cling
Ink: Black Stazon, plus Garden Green marker from Regals assortment
Card stock: Very Vanilla
Click above to place an order any time, day or night,
but if you have any queries, or prefer to speak to me, I'm always happy to help.
You can contact me by email or phone on 01280 820593.

CHOOSE A FREE SALE-A-BRATION GIFT WITH EVERY £45 YOU SPEND (excl p&p)

I've probably mentioned before that my little nephew once delighted me by getting 'see you later alligator' all wrong and simply saying "Bye Alligator!" Naturally the whole family now says this regularly and it's often followed by a startlingly modern "S'laters crocodile!"

See you tomorrow with a bit of Crafting Clare TV!


Tuesday 25 February 2014

Life In the Forest at Christmas

You can never start too early - isn't that what they say about making Christmas cards? Well I'm willing to go along with anything that makes December less busy so whenever I get a festive idea, whatever the time of year, I go for it! Come and see:


The moment I saw Stampin' Up's Life in the Forest set, I was desperate to paper piece those gorgeous little fir trees - after I'd finished cooing over all the cute little animals in the set that is!


I used my fabulous Scalloped Tag Topper punch to make a tag for the card and positioned it on an angled piece of Tangerine Tango card stock. The tag top provided the perfect opportunity to add some of my stitched grosgrain ribbon, tied up with a little bakers twine!


Once I'd added the strip of washi tape and a sprinkling of Melon Mambo and Tangerine Tango candy dots, the card was ready for the sentiment. I used a Melon Mambo marker to stamp a banner frame from Itty Bitty Banners, then used my stamp-a-majig to position a Christmas sentiment inside - you can see how to do this here in my short stamp-a-majig video tutorial:


There was no shortage of inspiration in Blogland today! The tag sketch at Retro Sketches, the fabulous colours at Dynamic Duos...


and last but not least, the nudge to get going with the cards from Sarn at Rudolph Day where the challenge is to make TWO festive cards! Did you think I'd forgotten? But no!


HERE'S WHAT YOU'LL NEED TO MAKE TODAY'S CARD
(Click on each item to find it quickly in my shop) 
Stamps: Life in the Forest wood or cling, Itty Bitty Banners wood or cling,
Embellished Events (sentiment) wood or cling
Click above to place an order any time, day or night,
but if you have any queries, or prefer to speak to me, I'm always happy to help.
You can contact me by email or phone on 01280 820593.

CHOOSE A FREE SALE-A-BRATION GIFT WITH EVERY £45 YOU SPEND

While I'm perfectly happy to think about Christmas cards I certainly don't want to see any snow until at least 23rd December. My children, on the other hand, would love it to snow so heavily they can't even get out of the front door - well not until it's been confirmed that school is closed anyway. They've only been back at school for a day!

See you tomorrow,


Monday 24 February 2014

Raising a glass or three

Today is a sad Monday because my children have all gone back to school after half term - but the news that I was the winner at CAS(e) this Sketch last week with this card has cheered me up no end! I'm always inspired by the sketches there and this week there's another great one. Here's what I've made...


... and here's the sketch I was working from:


I knew I wanted to use the lovely champagne glasses from Stampin' Up's Embellished Events stamp set  and thought sequins and bubbles would form the right sort of shape.


I thought it was going to look a little too minimilist though - even for me!  - so I added interest with a split panel. I used a combination of lovely textured core'dinations card stock and Soft Sky smooth and stamped the glasses over both.


Have you noticed those curved corners on the panel? My envelope board did those - that board has to be one of the most useful items in my Craft Square Metre!

HERE'S WHAT YOU'LL NEED TO MAKE THIS CARD
(Click on each item to find it quickly in my shop) 
Stamps: Embellished Events wood or cling, Express Yourself (hostess set)
Other: Envelope board (used to round corners), sequin trimstamp-a-majig
Click above to place an order any time, day or night,
but if you have any queries, or prefer to speak to me, I'm always happy to help.
You can contact me by email or phone on 01280 820593.

CHOOSE A FREE SALE-A-BRATION GIFT WITH EVERY £45 YOU SPEND (excl. p&p)

We had a lovely half term but why is it that everything always gets crammed in at the end? It all started in the most relaxing way but now we all need a holiday after the holiday!

See you tomorrow,


Saturday 22 February 2014

Petal Parade - or is that Metal Parade?!

It's sleepover city at our house this weekend as my children wring the last pleasures out of the holidays, but that means that no-one has noticed me sneak off to fiddle about with inks and card! Come and see what I've made:


I'm fascinated by the contrast between the masculinity of the metal plate and the femininity of the stamped flowers. You may recognise those flowers - they're stamped with Stampin' Up's Petal Parade, one of the gorgeous stamp sets you can get free with a £45 order during Sale-a-bration. Oh and there's a little flower in there from Banner Blast, another of the free sets!


I think the metal plate is quite convincing but it is in fact pierced silver foil card stock. The foil shape was cut using one of the Adorning Accents edgelit dies - so easy to use these now I have my magnetic platform to hold them firmly in place as I run them through the Big Shot! I've tried to take a close up but I'm sure I'm not the only LiMette this afternoon who has found that metal finishes are the very devil to photograph!

I was inspired today by Less is More where the challenge is to use Metal on a card (I'm hoping my faux metal will pass muster!) and by this week's fabulous Colour Q colour palette (you may notice I've swapped the peachy colours for corals instead.)


HERE'S WHAT YOU'LL NEED TO MAKE THIS CARD
(Click on each item to find it quickly in my shop) 
Stamps: Petal Parade (free with Sale-a-bration), Express Yourself (hostess set)
Click above to place an order any time, day or night,
but if you have any queries, or prefer to speak to me, I'm always happy to help.
You can contact me by email or phone on 01280 820593.

CHOOSE A FREE SALE-A-BRATION GIFT WITH EVERY £45 YOU SPEND (excl. p&p)

All this thinking of metal reminds me of a time my boys turned into metal detectors. We'd gone to a beach when they were small and I was lying in the sun while my boys built a sandcastle nearby. I smiled as I listened to them happily weaving stories of pirates and treasure. After a while, a note of unbridled excitement crept into their game and I looked up to find that they were digging a good deal more frantically than usual and had accumulated quite a pile of loose change - I suppose they'd been building on a site where a dad had been buried in the sand and had lost the contents of his pockets! The boys' booty probably amounted to less than a pound, but their enthusiasm for sandcastle building became quite obsessive from then on!

Enjoy the rest of your weekend and I'll see you very soon,


Friday 21 February 2014

New technique using Stampin' Up's Chalk Marker ?

The other day I found myself looking at my Stampin' Up Chalk Marker fondly. There's a whole lot of fun to be found in this £3.25 little pen! Not only is it perfect for the trendy chalkboard technique, but also for highlighting and colouring - and now I've discovered something else it can do! Come and see:


What do you think?! It's a little bit like the resist technique, except that the marker doesn't entirely resist the ink, it just kind of dilutes it. Here, I stamped one of the flowers from Peaceful Petals onto Basic Grey card stock, and coloured the petals using the Chalk Marker...


... . When I added Blushing Bride over the top I loved how delicate it looked!

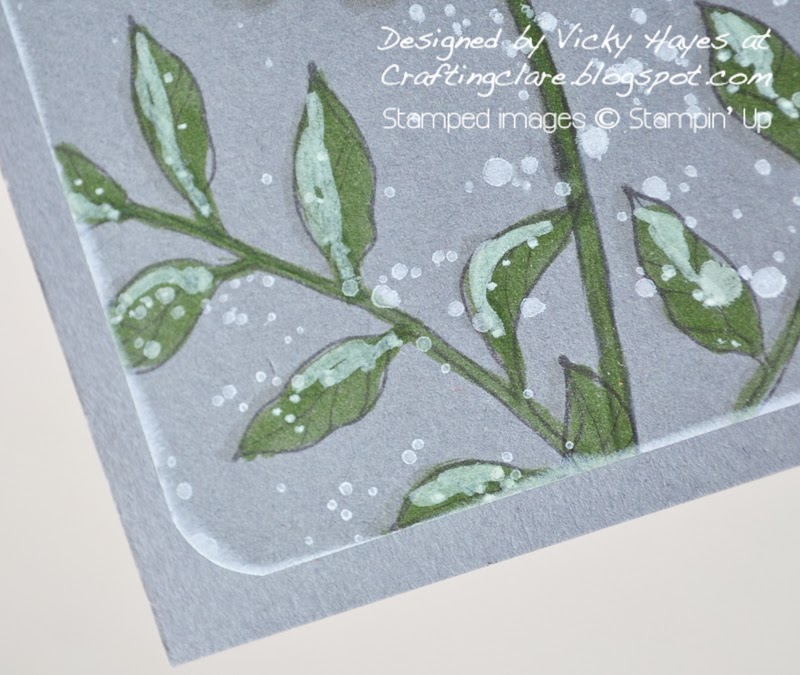
The leaves got a slightly different treatment: I just used the Chalk marker to highlight where I wanted the ink to be diluted and used Garden Green to colour over the top:


To add to the ethereal look, I used Whisper White craft ink to stamp the speckle image from Gorgeous Grunge over the whole panel and, after rounding the corners, swiped my inkpad around the edges too.

HERE'S WHAT YOU'LL NEED TO MAKE THIS CARD
(Click on each item to find it quickly in my shop) 
Stamps: Peaceful Petals wood or cling, Gorgeous Grunge wood or cling
Card stock: Basic GreyWhisper White (for the lining)
Other: Chalk Marker, envelope board (for corner rounding) stamp-a-majig
Click above to place an order any time, day or night,
but if you have any queries, or prefer to speak to me, I'm always happy to help.
You can contact me by email or phone on 01280 820593.

CHOOSE A FREE SALE-A-BRATION GIFT WITH EVERY £45 YOU SPEND

When my children were small, I gave them chalk to draw with outside but they never really took to the idea. On the other hand, there are three adorable small boys who live up the road from us who have taken the chalk idea to a new level! I have walked home on a pavement transformed into a complicated road system, complete with traffic lights and give way signs, and been saluted by tiny cops on their police bikes. Once, we saw that they had decorated their dad's parking bay with chalk and their mum had helped them to write: Reserved for a VIP. We love you Daddy xxx. Even my boys melted at that!

Thank you for joining me today. Have a lovely weekend and I'll see you very soon,


Thursday 20 February 2014

Three minutes of Peaceful Petals

If you've been wanting to know just how to use a stamp-a-majig to get your stamped images where you want them, you're in luck! I have a video tutorial here today! Scroll down to see that, but first, it's Three Minute Thursday here so it's time for a quick card or two. Come and see:

To make the first card I stamped the flower and leaf images along the side and top of the card, then coloured the small flowers and the leaves in with an aquapainter. This doesn't take any time if you just scribble the colour on! I sponged a little ink along the stamped edges of the panel for a bit of extra definition.


The sentiment was layered over the top of the stamping using my stamp-a-majig to make sure it was centred and straight. I chose Bermuda Bay, Calypso Coral and Tangerine Tango for my colour palette and you wouldn't want to go any darker than that otherwise the sentiment won't show up.

While making this card I had a sudden idea so naturally I had to make another one!


I stamped another floral panel, exchanging the Calypso Coral ink with Rich Razzleberry for a bit more contrast. Instead of stamping the sentiment over the stamped images, I punched an oval out of the panel using my Extra Large Oval punch. This enabled me to stamp the sentiment inside the oval on the card base itself.


Once the panel was sponged with ink, I attached it to the card base using dimensionals and added a stamped and punched butterfly I found in my snippets tray - it was Rich Razzleberry too so it was obviously meant to be!

So, not only is this a snippetty card, ready to take along to the Snippets Playground this week, but it's covered in flowers and butterflies too (well okay, butterfly!) so it looks like another entry for Mrs A's Butterfly challenge!

I've made a video tutorial to guide you through using the stamp-a-majig. If you have any questions, do feel free to ask away!


HERE'S WHAT YOU'LL NEED TO MAKE TODAY'S CARDS
(Click on each item to find it quickly in my shop) 
Stamps: Peaceful Petals wood or cling, Sassy Salutations wood or cling, Papillon Potpourri wood or cling
Card stock: Whisper White
Click above to place an order any time, day or night,
but if you have any queries, or prefer to speak to me, I'm always happy to help.
You can contact me by email or phone on 01280 820593.

CHOOSE A FREE SALE-A-BRATION GIFT WITH EVERY £45 YOU SPEND (excl. p&p)

I usually go to the cinema with my youngest son in the holidays and yesterday we went along to see The Lego Movie. We like to get there early to view the trailers and I particularly enjoyed the one where Harrison Ford comes on and invites you to think of a favourite movie you and your family watch over and over again. I exchanged glances with my son, remembering the countless times we've sat down together and watched the adventures of a galaxy far, far away, but before I could open my mouth to say 'Star Wars', my son smiled at me and said 'Tangled' instead! What a sweetheart he is!

See you tomorrow,


Wednesday 19 February 2014

Peaceful Petals on the tiles

I'm always banging on about the stamp-a-majig and how brilliant it is. It helps me to be a neater stamper, with straight sentiments and accurate image positioning,  but it also enables me to do more with my stamps - make a new sentiment for example, by combining words from different stamps or add part of one image to another using markers. The repeat stamping on today's card certainly wouldn't have been possible without a stamp-a-majig - come and see:


Stampin' Up's Hello Lovely set contains loads of gorgeous images which look great stamped together collage style but the tile image was the first thing I noticed. To me, it was just crying out to be repeat-stamped to make a bold background! Enter the stamp-a-majig!


Rich Razzleberry was out on my desk so I ended up with a lovely zingy tiled look! What on earth would hold its own on top of that I wondered... Well, how about this beautiful flower from Peaceful Petals? Not looking so ragingly peaceful in hot yellow is it?!

• If you'd like to know how to use a stamp-a-majig, take a look at my new video tutorial - it will be featured here on my blog tomorrow!

HERE'S WHAT YOU'LL NEED TO MAKE THIS CARD
(Click on each item to find it quickly in my shop) 
Stamps: Hello Lovely wood or cling, Peaceful Petals wood or cling
Click above to place an order any time, day or night,
but if you have any queries, or prefer to speak to me, I'm always happy to help.
You can contact me by email or phone on 01280 820593.

CHOOSE A FREE SALE-A-BRATION GIFT WITH EVERY £45 YOU SPEND (excluding p&p)

Have you noticed that I'm using a lot of yellow lately? I must be feeling really positive - well, either that or a bit banana-ish! Which reminds me of when the boys were little and my eldest couldn't say banana but said sublana instead, so of course we all said it!  I used to amuse them by springing out from behind doors a la Starsky and Hutch with a banana in my hand instead of a gun. "Freeze!" I would shout convincingly. "I've got a sublana and I know how to use it!"

See you tomorrow,


Tuesday 18 February 2014

Peaceful Petals and more Peaceful Petals!

I freely admit it took me hours and hours of tortured agonising to make my first card for Mrs A's new Butterflies challenge. The challenge requires a flower and a butterfly to appear on any handcrafted item and if you like flowers and butterflies (and I do!) nothing should have been easier! I couldn't get the darned thing to go right though so eventually I gave up, made a different card in about two seconds flat and then went back to my butterfly-ish one which just needed a fresh eye and a tweak or two! All this is just to explain why you get two cards today - come and see:


Okay, this is my entry for Mrs A's challenge: I used Stampin' Up's gorgeous Peaceful Petals stamp set to stamp a clump of flowers on Naturals Ivory card stock. The tallest flower was coloured in with markers and then I scored a nice frame round the edge of the card using my Simply Scored tool.


Those gorgeous flowers attracted a pair of pretty, yellow butterflies, cut with my Beautiful Wings embosslits die. They seemed quite happy in there together but the card lacked balance. What sorted it out in the end was the addition of the leaf from the same stamp set, stamped, fussy cut and left uncoloured, and a third butterfly.  I know three is supposed to be a crowd but the other two butterflies must have just been good friends!


There are two lovely sentiments in this set and I stamped one of them, nice and straight, using my stamp-a-majig (don't forget my tutorial is coming on Thursday if you'd like to know how this works!)

Are you wondering about the other card? Well here it is, all pale and interesting:


It looks quite different but in fact it started life in the same way as the other card - the large flower was stamped a couple of times, on Vanilla card stock this time, and the frame was scored. This time though, I decided to add a separate, fussy cut large flower. Oh yes, it's Fussy Cut City around here at the moment!


This works quite nicely with a paler sentiment - but adding a butterfly would have overdone it. So I went a little pearl-tastic instead!

HERE'S WHAT YOU'LL NEED TO MAKE THESE CARDS
(Click on each item to find it quickly in my shop) 
Stamps: Peaceful Petals wood or cling
Click above to place an order any time, day or night,
but if you have any queries, or prefer to speak to me, I'm always happy to help.
You can contact me by email or phone on 01280 820593.

CHOOSE A FREE SALE-A-BRATION GIFT WITH EVERY £45 YOU SPEND

It's half term here which is always exciting as I never know what I'm going to be doing next! It's always a bit hectic but I don't mind because I get to spend more time with my lovely children. Here's a little gem from yesterday when I was talking to my youngest son about France. "Come on," I said. "Let's speak French!" He looked at me sternly. "Non," he said.

See you tomorrow,